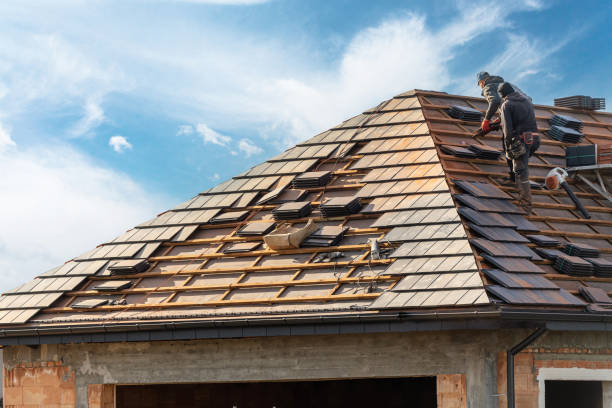
Your roof is one of the most critical components of your home, protecting you and your belongings from the elements. However, like any other part of your home, roofs have a limited lifespan. Recognizing the early signs of roof damage or wear can save you from costly repairs or potential structural damage. Here are seven key signs that it might be time to replace your roof, along with tips on how to identify them.
1. Curled, Cracked, or Missing Shingles
Shingles act as the first line of defense against weather-related damage. If you notice:
– Curling shingles – This often occurs due to prolonged exposure to heat or aging.
– Cracked shingles – These can result from wind damage or direct impact over time.
– Missing shingles – Exposed areas may lead to leaks and further damage beneath the roof surface.
Inspect your roof periodically or after heavy storms to spot these issues early.
2. Granule Loss in Gutters and Downspouts
Asphalt shingles lose granules over time due to wear and tear. Excessive granule loss is a sign that your roof’s protective layer is deteriorating. Check gutters and downspouts for an accumulation of these small particles during regular cleaning.
3. Sagging Roof Sections
A sagging roof often indicates structural problems in the decking beneath the shingles—possibly caused by prolonged exposure to moisture or inadequate support beams. Look for uneven surfaces or visible dips along the roofline.
4. Leaks and Water Damage Inside Your Home
Water stains on ceilings or walls are strong indicators of a failing roof system:
– Look for brownish stains near corners or light fixtures.
– Check attics for damp insulation, mold growth, or dripping water during rainfall.
Early detection can prevent widespread water damage within your home’s structure.
5. Age of Your Roof Materials
The average lifespan varies depending on materials:
| Roofing Material | Average Lifespan |
|————————–|———————-|
| Asphalt Shingles | 20–30 years |
| Metal Roofing | 40–70 years |
| Clay/Concrete Tiles | 50+ years |
If your current roofing system is nearing its expected lifespan, it’s wise to start planning for replacement before significant issues arise.
6. Daylight Visible Through Roof Boards
Go into your attic during daylight hours with lights off. If sunlight streams through gaps in your roofing boards, it’s likely that there are holes due to missing shingles, broken flashing, or structural aging.
7. Moss, Algae, and Mold Growth
Moisture retention on shaded parts of a roof leads to moss and algae growth over time:
– Moss traps moisture against shingles, accelerating deterioration. – Algae causes dark streaks that weaken asphalt shingle integrity. Regular maintenance like cleaning with appropriate solutions can slow this process but may not solve underlying issues if they persist.
When Should You Call a Roofing Repair Company Minneapolis MN?
If you observe more than one of these signs—or suspect severe underlying issues—it’s best not to delay calling a professional roofer for an inspection:
– A qualified contractor can assess overall condition accurately. – They’ll provide estimates on repair versus replacement costs tailored specifically for your roofing material type.
Timely action ensures safety while potentially saving thousands in future expenses related both directly (such as repairs) AND indirectly (increased energy bills).
Roofing Contractors Minneapolis MN: Costs and Essential Considerations for Your Roof Replacement
Planning for a roof replacement can feel overwhelming without proper guidance. Understanding the costs, factors influencing pricing, and essential considerations is crucial to ensure a smooth and efficient process. A well-budgeted roof replacement not only protects your home but also enhances its value. Below is a guide to help you navigate through the specifics of budgeting for a new roof.
Key Factors That Influence Roof Replacement Costs with a Roofing Company Minneapolis MN
- Larger roofs naturally require more materials and labor, increasing costs.
- Steeper pitches may require specialized equipment or additional safety measures, leading to higher expenses.
- Roofing Material
Different materials come with varying price points: - Asphalt Shingles: $100–$150 per square (most affordable option).
- Metal Roofing: $300–$800 per square.
- Clay or Concrete Tiles: $600–$1,000 per square.
- Slate Roofing: $1,000–$2,000 per square (premium choice).
- Labor Costs
Regional labor rates can vary significantly based on demand, availability of skilled workers, and job complexity. - Roof Features
Skylights, chimneys, valleys, or dormers often add complexity to the roofing job, increasing both material usage and installation time. - A tear-off involves removing old roofing materials before installing new ones; this adds labor costs.
- An overlay requires less work but may compromise long-term durability if not done carefully.
Additional Expenses to Consider for Roofing Service Minneapolis MN
- Permits: Local regulations may require permits for roofing projects—fees typically range from $50–$500 depending on location.
- Disposal Fees: Removing old shingles or other roofing materials generates waste requiring disposal. Expect charges between $100–$300.
- Repairs During Replacement: Hidden damage such as rotting wood or structural issues can increase costs by several hundred dollars or more.
| Factor | Cost Range |
| Materials | $100–$2,000 per sq* |
| Labor | 40%–60% of total cost |
| Permits | $50–$500 |
| Disposal Fees | $100–$300 |
| Repairs During Job | Varies ($200+) |
*A “square” is equivalent to 100 square feet of roofing material.
Smart Tips for Budgeting Roofing Repair Minneapolis MN Effectively
- Obtain quotes from at least three professional contractors to compare pricing and services offered.
- Prioritize quality over cost alone—choosing cheap materials or unqualified contractors can lead to problems down the road.
- Set aside an emergency fund (approximately 10%-15% of your total budget) for unforeseen expenses like structural repairs.
- Research energy-efficient options such as cool roofs or reflective coatings that may qualify you for tax incentives or rebates.
Exploring Financing Options for Roofing Minneapolis MN
- Home Equity Loans/Lines of Credit (HELOC): Use equity in your home as collateral; typically offers lower interest rates.
- Personal Loans: Unsecured loans are widely available but often come with higher interest rates compared to HELOCs.
- Roofing Company Payment Plans: Many contractors offer flexible payment plans tailored to fit your needs.
- Insurance Claims: If damage is caused by severe weather events like hailstorms or windstorms, consult your insurance provider about coverage eligibility.
By factoring in all relevant considerations—including material types, labor costs, permits—and exploring financing solutions where necessary—you’ll be better equipped to manage your roofing project within budget while ensuring long-lasting results for years ahead.
Expert Tips on Roof Installation Minneapolis MN and Addressing Hail Damage
Roof hail damage is one of the most common types of storm-related roofing issues. Left unaddressed, it can lead to leaks, water damage, and structural deterioration. Here is a professional guide on how to identify hail damage and take the necessary steps to repair it efficiently.
Identifying Roof Hail Damage
- Shingles – Look for bruising: Gently run your hand over the surface of asphalt shingles to feel for soft spots or indentations. – Notice missing granules: Bald spots or exposed black substrate can indicate granule loss caused by hail. – Cracks or splits: Check for cracks across shingle surfaces that may weaken their protective function.
- Gutters and Downspouts – Inspect for dents: Hail impacts often leave visible dents on metal gutters and downspouts. – Check for granules in gutters: Excessive accumulation of shingle granules in gutters is a potential sign of roof damage.
- Flashing and Vents – Examine metal components like flashing, vents, and skylights for dings or bends caused by hailstones. – Look for chipped paint or exposed metal that could rust over time.
- Siding, Windows, and Roof Accessories – Check siding panels, window screens, chimneys, or satellite dishes near the roof area. Hail can cause cracks, dents, or other damages in these components too.
- Assess the Severity of Damage – Take photos and document all affected areas before proceeding with repairs. – Determine if only cosmetic repairs are needed or if structural fixes are required.
- Contact Your Insurance Company – Notify your insurer promptly after identifying hail damage. – Schedule an inspection with an insurance adjuster to determine coverage under your homeowner’s policy.
- Hire a Professional Roofer Hiring a licensed roofer ensures quality repairs that adhere to safety standards: – Verify certifications and references before hiring. – Ensure they provide an accurate estimate after inspecting your roof.
| Criteria | What to Look For in a Roofer |
| Licensing & Insurance | Verify state licensing and liability insurance |
| Reviews | Positive customer reviews on reliable platforms |
| Warranty | Offers warranties on materials & labor |
Preventative Measures Against Future Damage
To minimize future roof damage caused by hail storms: 1. Install impact-resistant shingles rated Class 4 (highest rating) under UL 2218 standards. 2. Conduct routine maintenance twice a year: – Clean debris from gutters and downspouts. – Inspect shingles regularly for wear and tear. 3. Trim trees near your property; overhanging branches can worsen storm-related damage during high winds.
Taking proactive steps now can help maintain the structural integrity of your roof while extending its lifespan significantly over time.
Roofing Repair Contractors Minneapolis MN: Everything You Need to Know About Soffit and Fascia Repairs
Soffit and fascia are two critical elements of your roof system that often go unnoticed until they require repair or replacement. These components not only enhance your home’s curb appeal but also play essential roles in ventilation, structural integrity, and protection from the elements. Here’s everything you need to know about soffit and fascia, as well as who you can rely on for their repair.
Understanding Soffit and Fascia: Insights from Roofers Minneapolis MN
- Soffit: The soffit is the material located beneath the overhang of your roof. It helps ventilate your attic by allowing air circulation, reducing moisture buildup, and aiding in temperature regulation. Typically made of vinyl, aluminum, or wood, soffits also prevent pests like birds or rodents from entering your attic.
- Fascia: The fascia board is mounted at the edge of the roofline, running horizontally where the roof meets the outer walls of your home. It provides a clean finish to cover the ends of rafters while serving as an anchor point for gutters. Most fascia boards are crafted using wood, PVC, or composite materials.
Both these components work together to protect your home from moisture damage and improve its aesthetic appeal.
Common Signs You Need Soffit or Fascia Repairs
- Peeling Paint: This often indicates water exposure or aging materials.
- Soft or Rotting Wood: A sign of moisture infiltration that could lead to further structural issues if left untreated.
- Animal Infestations: Birds nesting in soffits or rodents chewing through them are clear signs of damage.
- Sagging Gutters: Weak fascia boards may no longer support gutter systems effectively.
- Visible Cracks or Holes: These openings allow water intrusion and can lead to mold growth in adjacent areas.
Who Repairs Soffit and Fascia?
Roofing Contractors
Roofing contractors specialize in all aspects of roofing systems, including soffit and fascia repairs or replacements. They assess structural issues related to these components while ensuring proper installation techniques.
Carpenters
Carpenters excel at handling wooden soffits and fascia boards by repairing rotted sections or replacing damaged areas with precision craftsmanship.
Gutter Specialists
Gutter specialists may assist with minor repairs involving fascia boards since they often work with these areas when installing gutters.
General Handyman Services
For smaller fixes such as repainting peeling sections or sealing minor cracks, a general handyman might suffice.
Factors Influencing Repair Costs
| Factor | Impact on Cost |
| Material Type | Vinyl is typically less expensive than wood or composite options. |
| Extent of Damage | Minor repairs cost less than full replacements requiring new materials. |
| Labor Rates | Prices vary based on expertise level (e.g., handyman vs roofing contractor). |
| Accessibility | Multi-story homes may incur higher costs due to additional safety measures required during repairs. |
On average, homeowners spend between $300-$1,500 for soffit and fascia repairs depending on these variables.
Why Timely Repairs Matter
Ignoring damaged soffits or fascia can lead to more significant problems such as water infiltration into your home’s walls or attic space, pest infestations compromising insulation effectiveness, and increased energy costs due to poor ventilation control.
By addressing issues early with help from qualified professionals like roofing contractors or carpenters experienced in exterior renovations, you can maintain both functionality and aesthetics while avoiding costly future repairs.
Avoiding Roofing Scams: 7 Common Scams That Cost Homeowners Thousands
When it comes to roofing, homeowners often find themselves vulnerable to scams. A damaged roof can be stressful, and unscrupulous contractors may take advantage of that urgency. Understanding common roofing scams is critical in protecting your investment and avoiding unnecessary expenses. Here are seven common scams to watch for, along with tips on how to steer clear of them.
1. The Storm Chaser Scam
Storm chasers are contractors who travel from town to town after major weather events, offering quick repairs at seemingly low costs. They often use high-pressure sales tactics and offer deals that feel too good to be true.
How to avoid this scam: – Verify the contractor’s license and insurance before hiring them. – Check for local reviews or references instead of relying on word-of-mouth. – Be cautious of unsolicited door-to-door offers after a storm.
2. Upfront Payment Demands
Some roofers will ask for a large upfront payment before starting any work. Once they’ve received the money, they may disappear or perform substandard work.
How to protect yourself: – Only agree to partial payments upfront (e.g., no more than 10%-30% of the project cost). – Establish a clear payment schedule tied to project milestones. – Request a detailed contract outlining terms, costs, and timelines.
3. Inflated Damage Claims
Dishonest contractors may exaggerate the extent of damage during their inspection. This technique is often used to justify higher repair costs.
Tips for prevention: – Get at least three quotes from reputable roofing professionals. – Request photographic evidence of any claimed damage. – Consider hiring an independent inspector for an unbiased opinion.
4. Low Bids with Hidden Costs
Low bids might seem appealing but can hide additional charges down the line for materials, permits, or labor—all things that should have been included in the initial quote.
What you can do: – Ask for a written estimate that includes all potential costs. – Read every line item carefully before signing any agreements. – Be wary if the bid is significantly lower than others; it could indicate poor quality materials or hidden fees.
5. Unlicensed Contractors
Hiring an unlicensed contractor might save you money initially but could cost you much more in the long run if something goes wrong.
To safeguard your home: – Always verify licenses and credentials through local licensing boards. – Check for proof of liability insurance and workers’ compensation coverage. – Avoid cash payments as these leave no paper trail in case of disputes.
6. Shoddy Workmanship
Some scammers use low-quality materials or unskilled laborers to cut corners while charging premium rates, leaving homeowners with roofs that deteriorate quickly.
Signs of poor workmanship include: – Uneven shingles or gaps in installation. – Missing flashing around vents and chimneys.
Protect yourself by: – Asking about warranties on both materials and labor. – Reviewing photos of previous projects completed by the contractor.
| Key Question | Why It Matters? |
| Are you licensed? | Ensures compliance with industry standards |
| Do you provide warranties? | Protects against future issues |
7. Insurance Fraud Schemes
Some roofers encourage homeowners to commit insurance fraud by inflating repair claims or waiving deductibles illegally. While this might sound like a shortcut toward savings, it can lead to serious legal consequences for homeowners.
Steps to avoid involvement: 1. Never allow a roofer to negotiate directly with your insurance company unless authorized by law in your area (e.g., public adjusters). 2. Review all documents submitted under your name carefully before signing anything related to claims. 3. Report suspicious behavior immediately both locally & via insurers’ fraud hotline services if doubts arise over ethics practices observed over time .
By being aware & vigilant homeowner will reduce risks exponentially around predatory actions targeted typically post-disaster periods

How Much Does a Metal Roof Cost? Comparing Key Factors That Influence Pricing
Metal roofing has gained significant popularity among homeowners due to its durability, energy efficiency, and modern aesthetics. However, the cost of installing a metal roof can vary widely depending on several factors. Below, we break down the key elements that influence the price of a metal roof and provide insights to help you budget effectively.
1. Type of Metal Roofing Material
- Steel (Galvanized or Galvalume): One of the most affordable choices, steel roofing typically costs $5 to $12 per square foot installed.
- Aluminum: Lightweight and corrosion-resistant, aluminum roofs cost about $9 to $16 per square foot installed.
- Copper: A premium option with unmatched longevity and aesthetic appeal, copper roofs can range from $15 to $30 per square foot installed.
- Zinc: Known for its self-healing patina, zinc roofing costs approximately $10 to $20 per square foot installed.
| Material | Estimated Cost Per Square Foot (Installed) | Durability (Years) |
| Steel | $5 – $12 | 40 – 70 |
| Aluminum | $9 – $16 | 50+ |
| Copper | $15 – $30 | 70+ |
| Zinc | $10 – $20 | 80+ |
2. Size and Complexity of Your Roof
The size of your roof is measured in “squares,” with one square equaling 100 square feet. Larger roofs naturally require more material and labor, driving up costs. Additionally, complex roof designs—such as those with steep slopes, multiple valleys, or intricate architectural features—can increase labor expenses significantly.
3. Installation Costs
Labor costs for metal roofing installation vary based on location and contractor experience but generally range from $3 to $7 per square foot. Complex installations can push this range higher.
When budgeting for installation:
– Ensure that your contractor specializes in metal roofing. – Request multiple quotes to compare pricing. – Confirm that both material warranties and workmanship warranties are included.
4. Underlayment and Accessories
For optimal performance, proper underlayment is essential beneath a metal roof. High-quality underlayments like synthetic membranes or felt paper add additional costs of about $0.50 to $2 per square foot but enhance weather resistance and durability.
Additionally, don’t overlook accessories such as:
– Ridge caps – Flashing – Fasteners These components ensure seamless installation but can add several hundred dollars depending on your roof’s size and design.
5. Regional Pricing Variations
Where you live will also impact the total investment required for a metal roof:
– Urban areas often have higher labor costs due to demand. – Materials may be more expensive in remote or rural locations due to transportation fees.
6. Long-Term Savings with Metal Roofing
While upfront costs may seem substantial compared to traditional shingles (which average around $5-$7 per square foot installed), metal roofs often pay off over time through:
- Fewer repairs or replacements over their lifespan.
- Energy savings due to their reflective properties (reducing cooling bills by up to 25%).
- Increased home resale value due to durability and curb appeal.
Final Thoughts on Budgeting for a Metal Roof
- Compare materials based on longevity, cost-per-square-foot, and aesthetics.
- Work with trusted contractors who specialize in installing the specific type of metal you’ve chosen.
- Factor in additional expenses like underlayment and accessories for accurate estimates.
By understanding these variables upfront, homeowners can make informed decisions tailored to their needs while ensuring quality results within their budget constraints.
7 Signs You Need a New Roof and How to Identify Them
Your roof is one of the most critical components of your home, protecting you and your belongings from the elements. Over time, wear and tear can compromise its ability to function effectively. While some issues can be repaired, there are clear signs that indicate it may be time for a full roof replacement. Here are seven key indicators you need a new roof and tips on how to identify them.
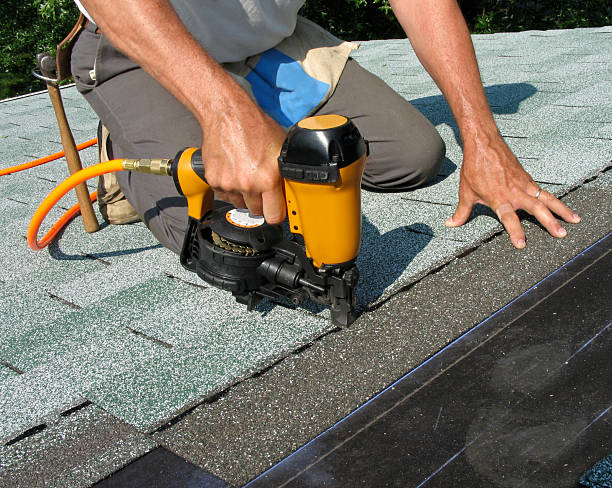
1. Missing or Damaged Shingles
Shingles are designed to provide a protective barrier against water and weather. If you notice missing, cracked, curled, or loose shingles during routine inspections, it’s a sign that your roof may no longer provide adequate protection.
What to Look For: – Bare patches where shingles should be. – Shingles with curled edges or cracks. – Granules collecting in gutters (an indication shingles are deteriorating).
2. Leaks or Water Damage
Water stains on ceilings or walls often point to a leaking roof. Left unaddressed, this can lead to structural damage and mold growth.
How to Check: – Inspect your attic for damp insulation or water stains. – Look for discoloration on interior walls and ceilings.
3. Sagging Roof
A sagging roof suggests structural issues that could result from trapped moisture, weakened framing, or aging materials.
Warning Signs: – Noticeable dips when viewed from outside. – Uneven areas on interior ceilings.
4. Age of Your Roof
The lifespan of your roofing material plays a big role in determining when replacement is necessary: – Asphalt shingles: Typically last 20–25 years. – Metal roofing: Can last 40–70 years. – Clay tiles: Generally last over 50 years.
If your roof is nearing the end of its expected lifespan or older than recommended for its material type, consider replacing it proactively rather than waiting for major issues.
5. Increased Energy Bills
A failing roof can lead to poor insulation and ventilation in your home, causing heating and cooling systems to work harder.
What This Means: – Higher-than-average utility bills may indicate air escaping through gaps in the roofing structure. – Lack of proper attic ventilation could exacerbate temperature fluctuations indoors.
6. Mold or Moss Growth
Mold and moss thrive where moisture collects, often signaling trapped water under roofing materials due to poor drainage or leaks.
Easy Identification Tips: – Green patches visible on shingles from ground level. – Musty odors near areas prone to leaks (e.g., attic spaces).
7. Worn Flashing Around Chimneys or Skylights
Flashing seals vulnerable areas like chimneys, vents, and skylights against water intrusion. Damaged flashing can lead directly to leaks.
Inspecting Flashing: – Check metal strips around chimneys for rust spots or cracks. – Ensure no gaps exist between flashing and adjacent surfaces.
Benefits of Addressing These Issues Early
Replacing a damaged roof before failure occurs ensures both safety and cost-effectiveness: | Issue Ignored | Potential Consequence | |—————————-|———————————————| | Delayed Replacement | Higher costs due to structural repairs | | Ongoing Leaks | Interior water damage & mold remediation | | Poor Insulation | Energy inefficiency & higher utility bills |
Keeping an eye out for these seven warning signs allows homeowners to catch problems early before they escalate into more significant issues requiring extensive repairs—or worse—emergency replacements during adverse conditions such as storms. Regular maintenance paired with professional inspections every few years ensures peace of mind when it comes time for repair decisions regarding one’s biggest investment—their home’s roofing system.
- How to Choose the Best Roofing Repair Company Minneapolis MN and When to Replace Your Roof
- 7 Signs You Need a Roofing Repair Service Minneapolis MN and How to Identify Them
- Key Signs Every Homeowner in Minneapolis MN Needs a Roofing Repair Service
- Important Questions to Ask Roofing Repair Contractors Minneapolis MN Before Installing a New Roof
- When Is It Time to Replace Your Roof and What Are the Warning Signs?
- 8 Ways Roofing Repair Contractors Minneapolis MN Can Help Identify Key Signs You Need a Roof Replacement
- How Roofing Contractors Minneapolis MN Can Increase Your Home’s Value with a New Roof
- Signs You May Need Roofing Repair Contractors Minneapolis MN